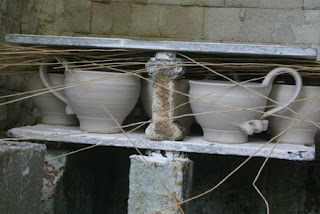
Firstly, The brick arrangement under the shelves is designed to force the flame to the front of the kiln. The surface area of the space between the bricks is equal to the surface area of the flame inlet mouths at the back of the kiln which also equals the exit flue in the floor off the kiln. That means that the same amount of flame can come into the kiln, find its way through the work and exit the kiln. draft can then be controlled by the damper and the stoking volume and rate.

The first layer of shelves goes onto the bag wall right up to the fire face. There is a coil of wadding along the bag wall to stop the draft going straight under the first shelf. It forces the flame to go up first without taking short cuts.

There is a gap of 13cm on either side of the shelves. The pots can overhang this gap as much as you like, it won't affect the firing. You will notice how crusty the kiln is; that's because I've fired it 120 times over the last 10 years.

Between the shelves I leave 1.5cm of space only, this is part of the total exit space calculation.

It is important to stack this kiln tight. How tight? Tight as a salmons sphincter should do it. I only leave one or two milimetres of space between pots. Firing raw means the pots will shrink away from each other anyway, but it is also important to stack as tight as possible because the kiln is built of insulating brick and doesn't store a heat mass, so the work must become the heat mass.

I try to get as many pots as possible into the kiln. These cups have no glaze on them at all, I am relying on the wood effects to glaze them for me, the best place for them is at the fire face. Glazed work should be stacked at the front of the kiln away from the direct flame.

The handles force me to leave more space above the pots than I would like. Ideally the space should be about 1cm.

I stack right up to the arch, keeping it as tight as possible. There is plenty of space between the pots for the flame to get through, and as it does it leaves ash and vapour flashing. If there is too much space around, above or between the pots, the flame will rush straight past the pots and up the chimney, taking all its ash and vapour with it.

The front shelves go in with the same 1.5cm gap.
A long brick bridges the gap over the flue.

The front stack is also stacked tightly, with work that I would prefer less ash on, like the black glaze, or pots that I want more red or orange flashing rather than ash deposit.
This firing only used 40 kiln shelves, but the maximum I have used is 80, all plates. The tighter it is stacked, the better. It usually holds about 400 pieces per firing.
hey euan..the twig/straw pieces between the pots is that to spread free ash across the kiln??looks great pre fire..
ReplyDeleteHi Ang,
ReplyDeleteThanks for the comment.
In the Bizen region of Japan they wrap pots in rice straw which has been dipped in a brine solution. When the straw burns it volatizes the salt giving flashed lines called "Hidasuki" in Japanese. What I am using is the straw from tatami mats, which is actually a sea grass or rush called "Igusa", and because it comes from the sea side it already contains natural salts, so a similar flashing occurs. I fire higher than Bizen kilns and therefore I am able to also flux out the other solid minerals in the ash which leaves the distinctive linear markings on my work. Hit the "Stacking" label on the blog for a slightly better example of the use of the straw. Next time I stack I'll do a detailed explanation on the blog. Watch this space!